When product is filled, the warehouse staff will place the picking ticket in the proper “Filled” tray. i.e. SHIPS, PICK-UPS, etc. The “Filled” trays are located beside the “To Be Filled” trays and are separated into specific slots depending on how the order is to be shipped. Note any changes on the pick tickets. These may need to be updated in Order Entry. These changes must be made before the Packing List is created. Packing List are created in SHIP to reflect:
- Who updated & printed the order
- The date the order was updated
- Warehouse personnel that pulled materials
- Packaging of materials. i.e. Box, Bag, Pallet, Rod Bundle
- All available materials pulled
To create a Packing List at a menu type “OM3” and ENTER. Select SHIP from the ring menu. Select ADD from the sub-ring menu. ADD and REMOVE are the only two selections the user will use in 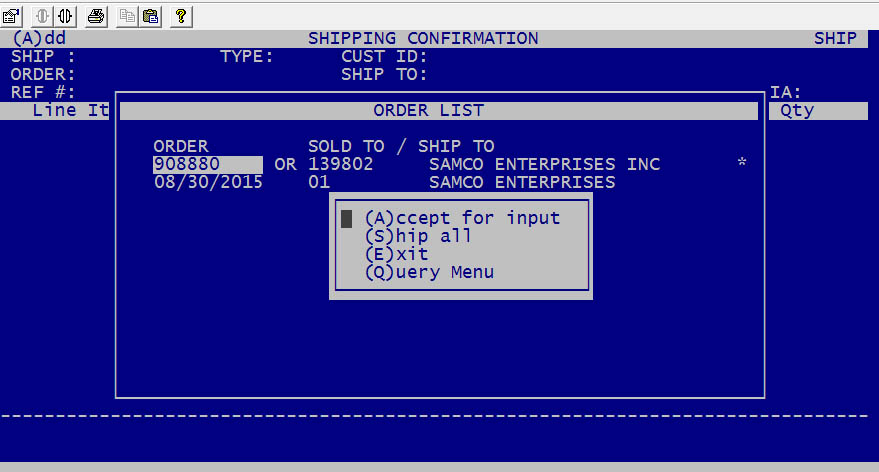 SHIP. A packing list is never updated with exception of a shipping quantity. A shipping quantity is the only field that can be updated in a packing list. If there are changes on the Picking-Ticket, the Packing List must be removed and re-typed for the corrections to take effect.
- Type the Order Number and press ESC.
- When the OPTIONS window appears, select “ACCEPT for Input.”
- In field 27, type “PRINTED BY (YOUR NAME) (CURRENT DATE)” and press ENTER. Ship orders require a little more information than delivery or pick-up orders. The ship order will be discussed below.
- In field 54, enter the delivery method. i.e. PICK-UP, OUR DELIVERY, SALESMAN DELIVERY, UPS, BEAVER etc. If you do not know the correct abbreviations, press CTRL G. When the new window pops up, use the arrow keys to find the correct method, then press ESC.
- In field 55, type the numbers of the warehouse personnel that filled the order and ENTER. If you do not know the correct personnel combination, press CTRL G. When the new window pops up, use the arrow keys to find the correct personnel combination, then press ESC.
- In field 56, type how the materials were packaged. i.e. 1BX = 1 box, 2BX = 2 boxes, etc. If you do not know the correct packing abbreviations, press CTRL G. When the new window pops up use the arrow keys to find the correct packing combination and press ESC.
- From the detail screen, select “CHANGE SHIP QTY” and enter the number of items shipped for each line followed by an ENTER.
- After all shipped quantities are updated, select “PARTIAL SHIP” to bring the user to a summary screen.
- If all the entered data is correct, select “ACCEPT” to pop-up a packing list window.
- When the packing list printing window appears, select “RUN” and pull the packing list off of printer LP5 (this printer is located in the front sales office.)
- Staple all three layers of the packing list together and place them either on top of the blue Packing List Sorter File for pick-ups, in the correct salesman’s folder for delivery or in the top, left tray of the “To Be Typed” tray, if they are for our general delivery.
- If order is to be shipped, take all three copies of the packing list to the shipping clerk for manifest logging and labeling. If the order is to be shipped and is a credit card order, attached the credit card information slip to the order and take all three copies of the packing list to the shipping clerk.
Ship orders are similar to all other orders except more information is required for correct processing. To create a ship packing list, at a menu, type “OM3” and press ENTER.
- Select SHIP from the ring menu. Select ADD from sub ring menu. ADD and REMOVE are the only two selections the user will use in ship.
- Type the Order Number, and press ESC.
- When the OPTIONS window appears, select “ACCEPT” for Input.
- Press ENTER at field 27 the user will enter information in this field at a later time.
- In field 55, type the numbers of the warehouse personnel that filled the order and ENTER
- In field 56, type how the materials were packaged, i.e. 1 BX 1 box, 2BX 2 boxes, etc. and ESC.
- The next window to appear is the detail screen. From the detail screen the user must select the header option from the ring menu. In the header the user will select field 27, and enter weight and package information and press ENTER.
- The “Printed By” information will be placed in either fields 10, 31, or 32. Field 10 is preferred, unless there is information entered, then go to field 31 or field 32.
- After the user has entered all the correct header information select EXIT from the ring menu to exit to the detail screen.
- From the detail screen select “CHANGE SHIP QTY” and enter the number of items shipped for each line followed by an ESC.
- When the packing list printing window appears, select “RUN”, and pull the packing list off of printer LP5, the printer in the front sales office.
- Take all three copies of the packing list to the shipping clerk for manifest logging and labeling. If the order is a charge card order, process the charge card and take the pink copy to the shipping clerk.
To exit the shipping confirmation, select EXIT from the ring menu, to take the cursor back to the “OM3″ menu.
If the order is complete, the pick ticket is stamped complete and filed for reference in the completed picking ticket folder, by the to-be-filled tray. Be sure to pull any information forms of paper from the picking ticket, i.e. Shop Materials Form which is usually pink or an OQC Form which is usually orange. Place the colored sheets in the correct coordinating associate’s tray. The incomplete or back order pick tickets are filed in the bottom slot of the Filled tray. If the order could not be filled complete, the pick ticket is sent to the Purchasing Department where material shortages are noted and ordered. Incomplete pick tickets are filed in the back order cabinet for future use.