The software we currently use to design and print our labels is AutoLabel 14. Most of our products should be relabeled using this labeling software. This section covers barcode product labels only. Any other labels have been covered in a separate section.
In this section we will learn:
- How to print a barcode product label.
- What barcode product labels should be used.
- When a barcode product label is needed.
- How to load labels into the printer.
- What happens if things go wrong.
Before we begin:
There are two computers capable of printing barcode product labels. One in the bag room and one in receiving. Both computers should be set up the same and the printing process should be identical.
Each computer should have two printers attached to them. One printer should have the 2X3 label loaded into it and rarely should the size change. The second printer may have a 4X6 label or a 3X5 label therefore if this is the size of label you wish to print you will need to verify the size of media in the printer.
What barcode product labels should be used?
As we previously discussed the label size is stated clearly for each label but how do you determine which label to select?
- The 2X3 which is intended to use on smaller packages and bags. This is the most common size.
- The 3X5 which is intended to use on some special customer labels, 18″ shelf bins, and sometimes locations on shelving. It is important to note the shelving 3X5 is an orange label. You should not use the white label for this purpose.
- The 4X6 which is intended to use on larger boxes, crates, or barrels. Rarely is this label ever used for any customer products.
These are the most common labels and the usage for these labels. However, there are still more.
2X3 Customer ID – Identical to the standard 2X3 label with exception to a customer ID. This label will allow the use to input any customer part number in the customer ID field.
2X3 Bin – This label should be used for the smaller tray sided shelf bins.
2X3 Location – This label should be used for a shelf ID. It can be used on the larger pallet racking shelf but it is intended to be used on the smaller warehouse shelving.
2X3 Pallet ID – This label is used primarily by receiving and will be discussed in the receiving department section.
3X5 Bin – This label provides the same function as the 2X3 bin label.
3X5 Special Customer ID – This label is primarily used when the customer preferences notate the need for special customer labeling. This label uses information that has been loaded into the MainFrame customer cross reference database. Keep in mind if the information does not appear in the preview the information is either not loaded into the database or it has not been entered correctly.
4X6 Cooper Cameron – This label is specifically used for this customer only.
How to print a label
Step 1 – Open the program.

There is an icon labeled “Click Print” on each desktop that will launch the label program.
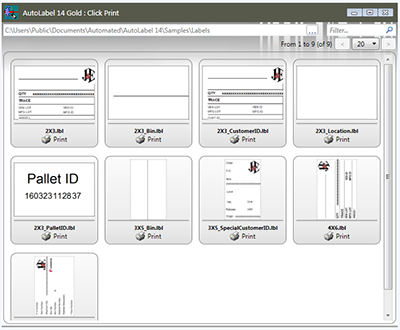
Step 2 – Select the label.
Once the program is opened you will be prompted to select the label you want to print. Simply select the label by clicking the respective print icon.
You will also notice that the label size and a short description of the label is listed above the print icon. If there is no description and just the size these are the standard J&E labels.
Step 3 – The input panel
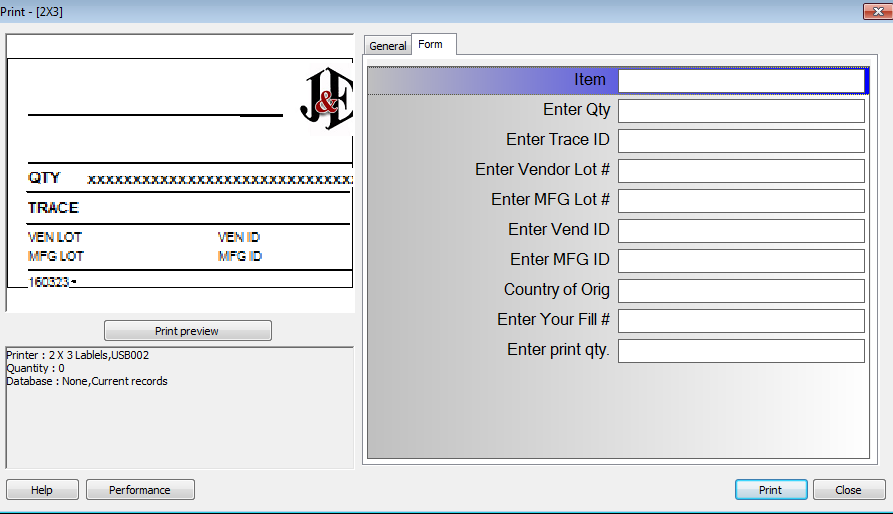
As you can see we will be looking at the 2X3 label. Each label may have different input fields and those special labels will be covered in a separate section. For the purposes of this tutorial we will be entering information for the 2X3 label which is identical to the 4X6 label.
The preview – You will notice that in the image here the preview section in the top left corner is, for the most part, blank. As we enter information into the fields to the right we will notice the preview will populate with the correct information. If information does not appear in the preview section after entering information the information is not correct.
The “General” and “Form” tabs – The form tab is the default tab. You may need to use the general tab to select the correct printer. The appropriate printer settings should already be selected for the label size. You should only need to select the printer not make any printer setting changes.
The form input area – This area should be self explanatory. Simply enter the information the form is prompting. You can move from one entry field to the next by simply using the tab key on the keyboard.
You will notice sometimes the input area has a red background shading. This is informing you that the necessary or required information has not been entered in yet. Once this criteria has been satisfied the background will have a blue highlight to it.
Once all the necessary information has been entered and you have ensured the correct printer has been selected simply press the “Print” button and your labels should print.
What is a barcode label needed?
Simply if you are in doubt print one.
Ideally, the barcode labels should be used anytime a customer preference demands it or if you have multiple labels that will have the same information on them.
You simply can not overuse the barcode printed labels but you can not use them enough.
How to load labels into the printer