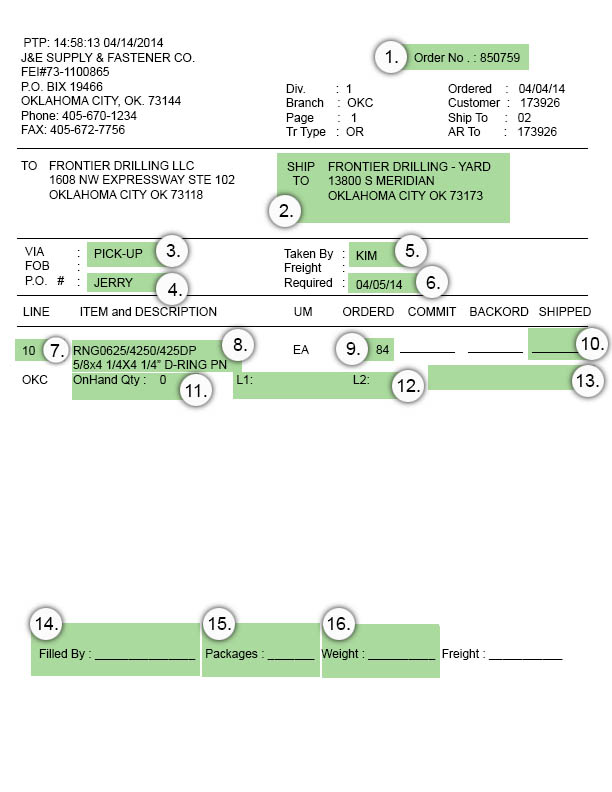
1. Order Number – The order number should be referenced on every shipping label placed on each package.
2. Ship To – The minimum that should be referenced on every shipping label placed on each package should be the name of the company listed under “Ship To.”
3. VIA – Via indicates to you where the packages must go when you are done with them.
Example:
- PICK-UP = Pick up area, filed under the first letter of the company name. If the company name begins with “The …” then the packages will be filed in the area designated for “T”
- BMOD = Bruce Marsley shelf
- UPS = The UPS shelf
- DELIVERY = The delivery shelf
4. P.O. – This stands for purchase order. The purchase order is a number given to us by the customer. It is a way for the customer to track the order in their system. This is also required to be on every shipping label placed on each package.
5. Taken By – This is who took or typed the ticket. If you have questions about the ticket, this would be the first person to ask.
6. Required – This is the required date the customer has specified. Unless otherwise instructed by your supervisor you should always compete the tickets with the oldest required date first.
7. Line Number – This is the line number for the product. They normally appear in ascending order in multiples of 10. There are exceptions to this and they will be covered in a separate training guide.
8. Item and Description – The first line here is the part number and the second is the first line of the description. Some parts have a second line of description and if so, it will show up just under the fist line of description.
9. Ordered – This is the amount the customer has asked for. If you have all the customer has asked for concerning the specific line, simply draw a circle around the quantity. If you do not have all that was originally requested, then you will move on to number 10.
10. Shipped – If you do not have all of the quantity that the customer has requested then you will write down how many pieces you were able to fill on this line.
11. On Hand Qty – This is the number of pieces we should have available of this particular part. This number does not take into consideration any other open orders that may have exhausted the available quantity. You can refer to using IPAI for this information.
12. L1 and L2 – This stands for location one and location two. Each location is capable of displaying two separate locations. Locations are separated by an alpha numeric combination.
13. Blank area – This is a blank area on the pick ticket where you can record the lot number for the line of product you are filling.
14. Filled By – This is where you will record your fill number.
15. Packages – Here you will record what packages the order consists of. You can abbreviate here but be clear. Give direction to where the product is if there is any deviation to the “VIA” (see line 3) stated on the ticket.
Examples:
- 1 Rod in shop
- 1 Pallet in receiving = 23 Boxes
- 2 Boxes 1 Bag
- 1 Box 1 Bundle
16. Weight – The weight of each package and a total should be listed here.
Note: In sections 15 and 16 you may not have enough room to record all the necessary information. This is okay. Just do the best you can to be clear.